Deobfuscating a Java Game Client
Introduction
This post is an extension of the “Building Bots for Java Games: A Beginner’s Guide” talk presented at BSides Prishtina 2023. As mentioned at the end of the talk, the topic of dealing with an obfuscated client was not covered.
Obfuscation, in simple terms, involves intentionally making the code difficult for humans to understand while keeping it functional. In the context of RSPS Client obfuscation, the goal is to deter, rather than completely prevent, individuals from decompiling the client and creating bots/cheat clients.
Therefore, the main objective of this blog post is to showcase various techniques that can be employed when faced with an obfuscated client. Additionally, it presents a practical case study that illustrates the application of these techniques in a real-world scenario.
If you’re interested in this topic, please check out the following blog post which links the slides and the video, as well as providing some additional context.
Tools
The following tools will be used:
Preface
From my personal observations, it appears that a significant number of RSPS Clients are built using the same boilerplate. This tendency can be attributed to the primary objective of commercial RSPS, which is focused on generating revenue. Consequently, developers often prioritize the creation of fresh content rather than rebuilding the client (or making changes under-the-hood), in which the majority of players wouldn’t notice anyways. This approach aligns with the popular adage, “If it ain’t broke, don’t fix it.”
Within the structure of an RSPS Client, it is highly probable to encounter a class known as Client, which serves as the core controller responsible for centralizing various functionalities. Embedded within this class are references to instances that would be of particular interest to bot developers, including references to the local player, NPCs, other players, and other interesting entities.
Here is an example of the Client class belonging to a 317 Client: Client.java
As such, the current goal is to locate the Client class in the obfuscated client.
The target client used for demonstration purposes in this blog post was randomly selected from Runelocus’ top list. To maintain respect for the developers and their intellectual property, the specific name of the client will not be disclosed.
Starting the deobfuscating journey
This section will be divided into multiple smaller sections, each focusing on a specific technique that can be utilized in the deobfuscation process. Each subsection will provide a detailed explanation of the technique along with a concrete example.
An effective analogy for comprehending the deobfuscation process is likening it to solving a puzzle. Initially, when you begin, it may appear that you have thousands of puzzle pieces with no clear indication of where each one fits. However, as you progressively assemble the puzzle, you start recognizing patterns that gradually make it easier to determine the correct placement of each piece. In essence, once you successfully identify the correct placement of a particular puzzle piece, it can serve as a valuable clue that offers insights into the whereabouts of the subsequent pieces.
As mentioned earlier in the Preface section, the majority of RSPS Clients will follow the same boilerplate. As such, it makes sense to find an open-source client which matches the revision of the client you are trying to deobfuscate. In this blog post, we will be using the open-source old-school RSPS Client that can be found at the following Github repository.
The next sections will assume you have already decompiled the client, I’ve found CFR to be an effective decompiler (linked in the Tools section above).
Note: A recent shift in the paradigm has introduced a two-stage structure for RSPS Game Clients. The initial stage, known as the launcher, is the component that users download. Its primary function is to validate whether the user has the latest game client installed. If not, it proceeds to download the most up-to-date client from the corresponding artifactory and saves it to disk. The second stage involves launching the game client itself (which the launcher does). In the upcoming section, our focus will be on the game client itself, rather than the launcher. Therefore, please make sure to locate the relevant client on your disk (typically found in the user’s home folder).
Class Visualizer (Static)
Class Visualizer is a really nifty tool which generates a visual diagram showcasing the relationships between classes and their respective inheritance structure.
Once Class Visualizer is loaded, click the File menu button in the navigation bar and select Load Classes -> from JAR files... and select the game client.
If successfully loaded, this is how Class Visualizer should appear:
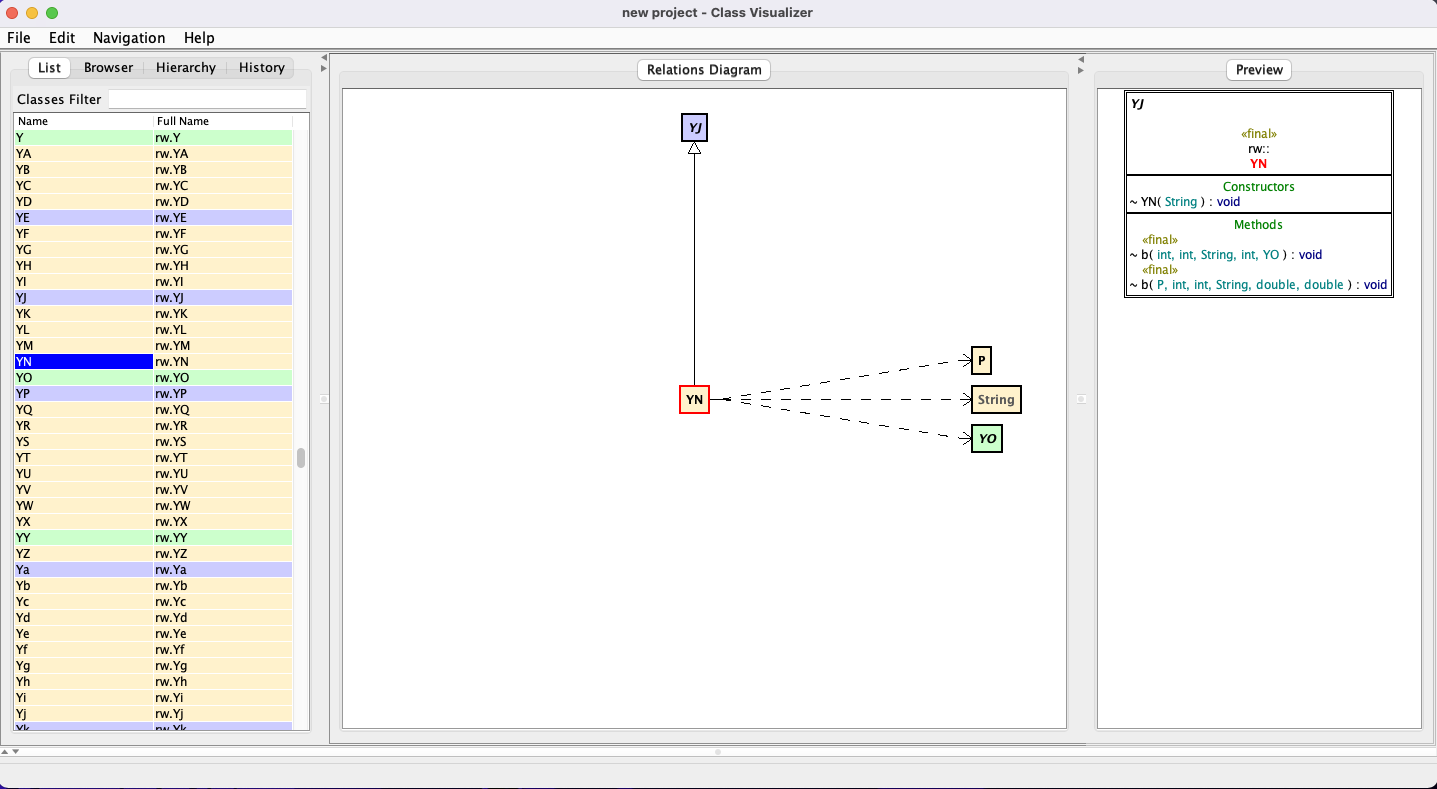
There will be three views. On the left hand-side there will be the list of classes loaded, while in the middle will be a relations diagram, and finally a UML Diagram on the right-hand side.
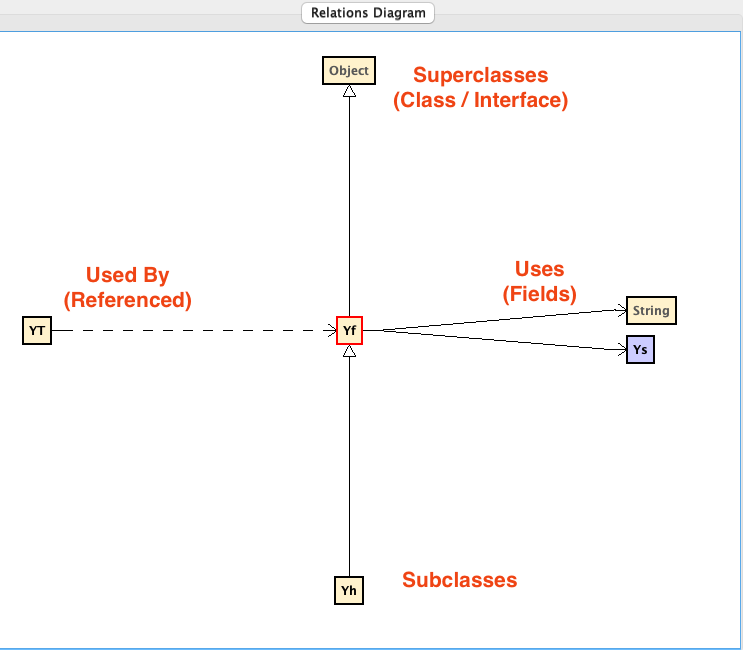
Here is a follow-up diagram on how to interpret the Relations Diagram view as it will arguably be the most useful:
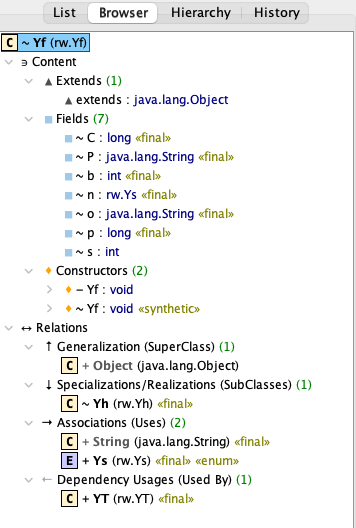
Note: This same information can be gleamed from the Browser View (in the left-hand side):
With the aid of Class Visualizer, we can embark on our journey through the vast collection of obfuscated classes.
In typical RSPS Client fashion, the client itself is a Java Applet bound to a JFrame. Typically there is a class called GameApplet which is responsible for building the respective frame and adding the various listeners to it:
https://github.com/TagsRocks/nardah_client/blob/master/src/com/nardah/GameApplet.java
Furthermore Client will inherit from GameApplet:
public class Client extends GameApplet {
  ...
// https://github.com/TagsRocks/nardah_client/blob/master/src/com/nardah/Client.java#L26
As such, we will need to work backwards in Class Visualizer and locate the Applet class which is a standard class bundled with the JDK:
Shown above, the xu class inherits from Applet meaning this would be the GameApplet class. However when visualizing the inheritance chain of the xu class, we notice there is no child class which inherits from it (which normally would be the Client):
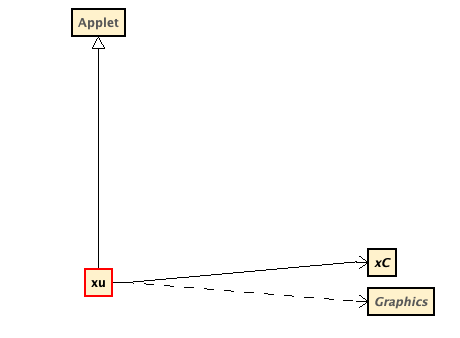
Instead we see that the xu class declares a field of type xC.
Visualizing xC shows the following:
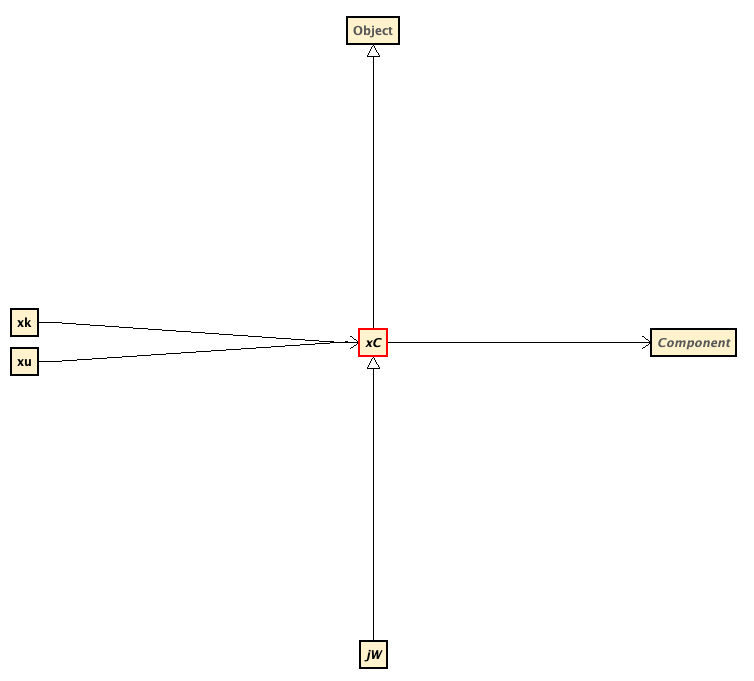
Within this visualization, we see that type jW inherits from xC, so let’s follow the trial and visualize the class:
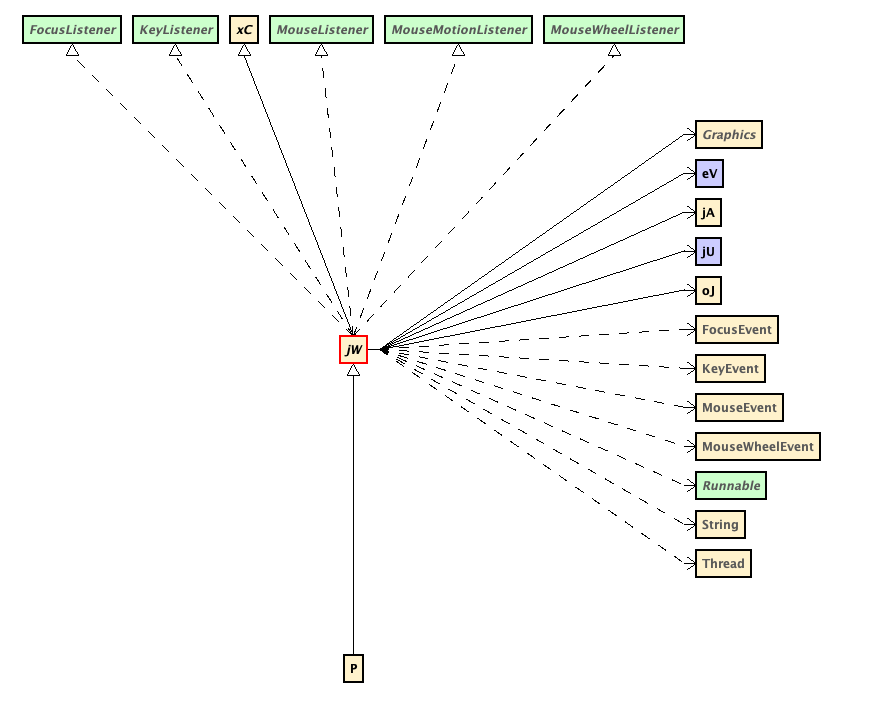
Notice that jW implements several interfaces including MouseListener and MouseMotionListener. Looking back at the GameApplet class in the open-source client, we notice that it also implements the same interfaces:
public class GameApplet extends Applet implements Runnable, MouseListener, MouseMotionListener, MouseWheelListener, KeyListener, FocusListener, WindowListener {

// https://github.com/TagsRocks/nardah_client/blob/master/src/com/nardah/GameApplet.java#L14
Based on the information available, it can be inferred that the given class is likely the GameApplet class, although it appears to have been structured differently compared to the GameApplet class found in the open-source client.
Moreover, upon observing that type P inherits from jW, it reinforces the hypothesis that jW is indeed the GameApplet class. If this assumption holds true, it implies that P is in-fact the Client class (spoiler-alert: it is).
In summary, utilizing Class Visualizer provides a valuable advantage in obtaining a comprehensive overview of the different types comprising the application and their interconnections, offering insights into how they interact with one another.
Leveraging Heuristics (Static)
This next sub-section will describe some heuristic techniques that can be used to help deobfuscate the client.
Hardcoded Values
Although obfuscators excel at concealing the names of types and variables, they often do not obfuscate hardcoded values such as integers and strings. These values tend to remain unaltered, providing potential clues and points of reference during the deobfuscation process.
For example, here is a snippet from the target client that is interesting:
public final class jd_0 {
    public static final String[] b = new String[]{"Attack", "Defence", "Strength", "Hitpoints", "Ranged", "Prayer", "Magic", "Cooking", "Woodcutting", "Fletching", ..., "-unused-", "-unused-"};
    public static final boolean[] o = new boolean[]{true, true, true, true, true, true, true, true, true, true, true, true, true, true, ..., true, false, false};
    public static final int[] P = new int[25];
In the code snippet above, it is evident that the string array contains the names of the game’s skills. Additionally, the boolean array is likely correlated with the string array, indicating whether the specific skill works. Furthermore, the final line initializing an array of integers will most likely hold the current level (or total experience) for each skill.
The next steps would be to see where these variables are referenced (hint: Class Visualizer can help) and go from there.
Helper Methods
Building upon the previous section, it is customary to encounter helper methods within the client, particularly those aimed at facilitating network operations. Some of these helpers include:
- Converting a type into its corresponding byte representation and vice-versa
- Converting endianness
It is important to note that the presence and implementation of helper methods within the client may vary depending on any modifications made by the developer to the underlying boilerplate.
For instance, it is common to find a variation of a helper method that writes an integer to the buffer as a short:
public void writeShort(int i) {
  buffer[currentOffset++] = (byte) (i >> 8);
  buffer[currentOffset++] = (byte) i;
}
However, it is worth mentioning that achieving the same outcome can be accomplished through different approaches, such as utilizing ByteBuffer:
byte[] byteArray = new byte[2];
ByteBuffer buffer = ByteBuffer.wrap(byteArray);
buffer.putShort(value);
Though at the current moment, we’ll assume that the developer kept the same pattern shown in the first example.
As mentioned in the previous section, obfuscators tend to not modify hardcoded values meaning in our case, we can look for the right-shift operation that extracts the most significant byte by 8 bits:
$ grep -ir '>> 8' .
This returns 187 matches, to help cut-down on the number of matches, we can use regular expressions:
$ egrep -ir '\(byte\)\s?\(\w+ >> 8\)' .

./gp_0.java:       byArray[n3++] = (byte)(n5 >> 8);
./b_0.java:        this.b[this.o++] = (byte)(n2 >> 8);
./b_0.java:        this.b[this.o++] = (byte)(n2 >> 8);
./b_0.java:        this.b[this.o++] = (byte)(n2 >> 8);
./b_0.java:        this.b[this.o++] = (byte)(n2 >> 8);
./b_0.java:        this.b[this.o++] = (byte)(l >> 8);
./b_0.java:        this.b[this.o++] = (byte)(n2 >> 8);
./b_0.java:        this.b[this.o++] = (byte)(n2 >> 8);
./b_0.java:        this.b[this.o++] = (byte)(n2 >> 8);
./yx_2.java:       this.b[1] = (byte)(n3 >> 8);
./yx_2.java:       this.b[4] = (byte)(n4 >> 8);
./yx_2.java:       this.b[0] = (byte)(n2 >> 8);
./yx_2.java:       this.b[2] = (byte)(n5 >> 8);
./yx_2.java:       this.b[5] = (byte)(n8 >> 8);
Awesome, this cuts-down the results to a total of 3 different classes.
After further examination, b_0.java looks to be the most promising as the following additional methods were discovered:
public final void b(int n2) {
    this.b[this.o++] = (byte)n2;
  }

public final void o(int n2) {
    this.b[this.o++] = (byte)(n2 + this.p.b());
}

public final void P(int n2) {
    this.b[this.o++] = (byte)n2;
}

public final void p(int n2) {
    this.b[this.o++] = (byte)(n2 >> 8);
    this.b[this.o++] = (byte)n2;
}

public final void C(int n2) {
    this.b[this.o++] = (byte)n2;
    this.b[this.o++] = (byte)(n2 >> 8);
}
Analyzing the provided code snippets, we can infer the functionality of each method by leveraging networking knowledge and referencing the open-source client.
For example, the first method is writing a single byte to the buffer, so we can conclude this is writeByte().
The second method (o) is a bit more tricky as it appears to invoke a method on the p field which we have no clue what it is. Luckily, this is where the open-source client comes in handy:
public void writeOpcode(int i) {
  buffer[currentOffset++] = (byte) (i + encryption.getNextKey());
}

// https://github.com/TagsRocks/nardah_client/blob/a6a8fb6ab1a83b8a6e4b1bc155fdac31f7aa655c/src/com/nardah/Buffer.java#LL70C2-L73
Perfect, we can now conclude this is the writeOpcode() method.
Lastly, we can observe that the last method C appears to be doing the inverse of the previously discovered writeShort() method - instead of writing the short value in big-endian format, it writes the bytes in little-endian format.
Similar the previous section, the next steps involve tracing the references of these helper methods to identify their respective callers. As packets serve as the means of communication between the client and server, this step is crucial and can be considered one of the most significant stages in the deobfuscation process.
Debugging with IntelliJ Idea (Dynamic)
The two preceding sections explored techniques that involved a static review process, which is indeed valuable. However, it is important to note that static review alone may overlook certain aspects or behaviors of the code. To achieve comprehensive results, combining static review with dynamic analysis is highly recommended. Furthermore dynamic analysis can help speed up the review process.
One approach to achieving this comprehensive analysis is by leveraging the the built-in debugger provided by the IntelliJ IDEA IDE. It is worth noting that IntelliJ offers the capability to debug JAR files, which may be relatively unknown. Furthermore, IDEA also includes a decompiler which makes it that much easier.
To accomplish this, follow the steps outlined below:
- Create a blank project in
IDEA. - Open the
Project Settingsby clicking the Project Name in the explorer and hittingF4(orFile->Project Structure). - Click the
Librariestab towards the left. - Within the
Librariesinterface, click the+and add the client jar. - Click
OKtowards the bottom right.
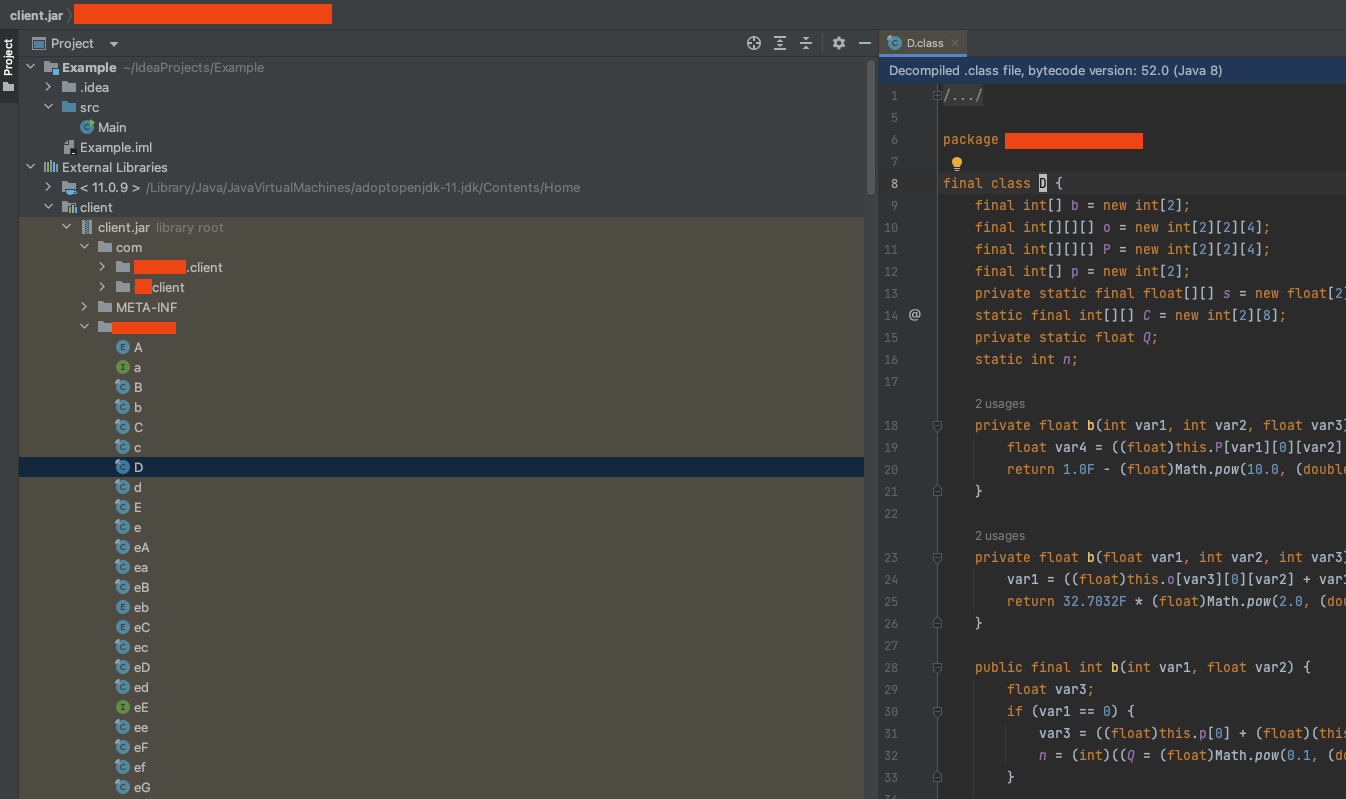
If done correctly, expand the External Libraries drop-down in the explorer and the client jar should be there. You can then expand the respective packages in the client jar and observe the decompiled classes:
The next step is to discover the location of the main method as a Run/Debug Configuration will need to be created. The easiest way to find this is to peek in META-INF/MANIFEST.MF, specifically the value belonging to the Main-Class attribute:
Manifest-Version: 1.0
Archiver-Version: Plexus Archiver
Created-By: Apache Maven 3.8.6
Built-By: burak
Build-Jdk: 17.0.6
Automatic-Module-Name: com.redacted.client-build
Main-Class: com.redacted.client.awt.AwtInitialization
When looking at the definition of the main method in the AwtInitialization class, the following is seen:
public static void main(String[] var0) {
    throw new UnsupportedOperationException("Main-method not supported");
}
Initially, it might be confusing as to why the entry point of the application throws an exception. However, this behavior is a consequence of the shift in the launcher paradigm mentioned earlier. The purpose of this design is to provide a seamless experience for the player, eliminating the need to manually open the launcher (which will download the game client), and then open the game client separately. Instead, the launcher is programmed to load the game client directly into its frame, creating the illusion of a seamless transition. One advantage for developers is that this approach allows them to enforce a specific pathway, ensuring that players can only access the game client by interacting with the launcher.
There are two approaches for getting around this. The first involves decompiling the launcher to understand how it loads the game client and then replicating that process. This method requires more effort and technical knowledge. The second approach is simpler and involves adding the launcher as an additional library to the project and then creating the Run/Debug Configuration using the launcher. As such, the second method will be used.
After adding the launcher jar as an additional library, we can repeat the process of locating the main method.
Once the class containing the main method has been located, right click the class and choose `Debug ‘

This will open the Run/Debug Configuration menu. Under the Build and run section, it will most likely say module not specified. Click the dropdown and select the appropriate JDK Version and finally click Debug.

Afterwards, the client should launch.
Now, it’s time to put the debugging functionalities to the test. As a way to wrap up this blog post, we will delve into the findings obtained through static analysis, specifically focusing on verifying if the P class indeed represents the Client class and investigating the behavior of the writeOpcode() method.
In the process of confirming the writeOpcode() method, we begin by locating the class that contains this method, which in this case is b_0. It’s worth noting that obfuscators often use similar class names, differentiating them solely by case sensitivity. For instance, two distinct classes, B and b, can have entirely different functionalities. To address this, the CFR decompiler automatically renames classes when encountering such situations. It also adds a comment within the class denoting the original name of the file, as shown in the following snippet:
/*
 * Renamed from client.b
 */
public final class b_0
This means that in IDEA, we will need to look for b.java.
After locating the presumed writeOpcode() method within the b class, we can proceed by setting a breakpoint on the first line within its definition:

After running the launcher using the debugger which will in-turn load the game client, we can attempt to login to our account. As soon as we successfully login, we notice that the breakpoint is successfully hit!
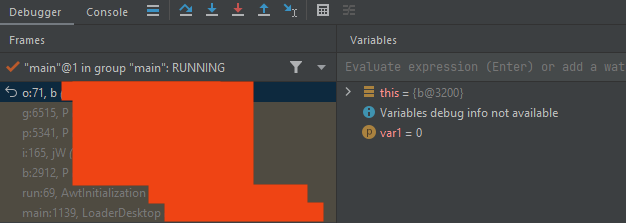
In this case, the value of 0 was passed to the writeOpcode() call. What’s more interesting is that towards the left-hand sign, we can observe the call stack.
Furthermore by double clicking the previous frame, IDEA will take us to where the call to writeOpcode() was invoked as well as provide context on the state of the variables at that current time:
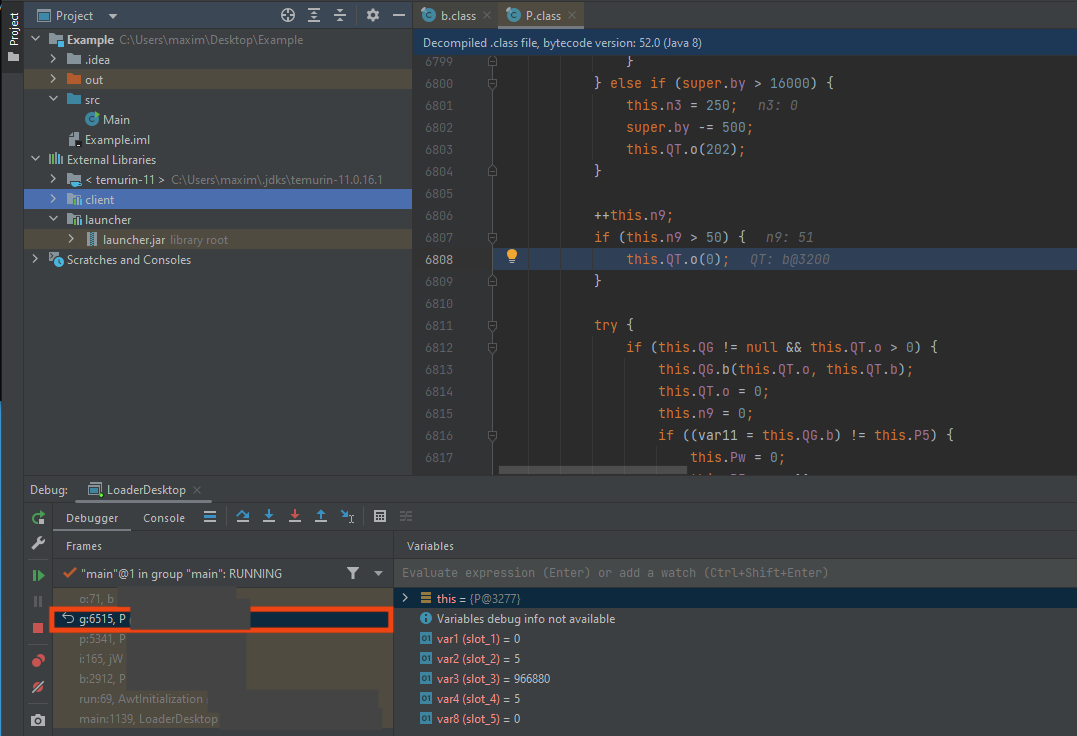
The call stack will be extremely helpful in understanding in how the code flows end-to-end.
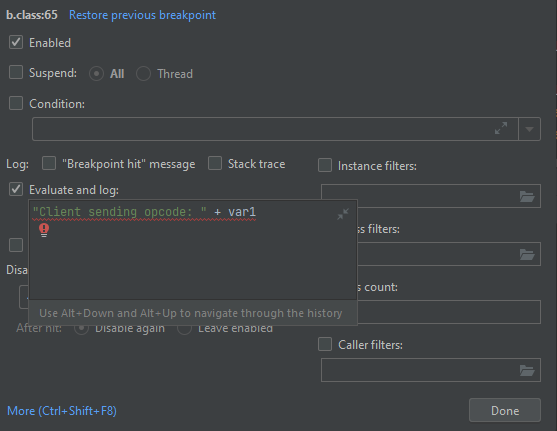
It’s worth noting that we have the flexibility to customize the behavior of this specific breakpoint. Considering that the client likely includes a ping functionality to maintain communication with the server, the writeOpcode() method may be called frequently. Suspending the entire process at each invocation could make the debugging process cumbersome.
To make the breakpoint less intrusive:
- Right click the breakpoint and click the
Morehyperlink. - Uncheck
Suspend - Check
Evaluate and log- Underneath the
Evaluate and log, enter the following into the input box:"Client sent opcode: " + var1- Note:
var1is the name of the method argument.
- Note:
- Underneath the
Next, let’s proceed with performing a repeated action in the client that triggers the sending of a packet to the server. One suitable action for this purpose is sending a series of chat messages in quick succession. In our case, three chat messages were sent back-to-back.
When looking at the IDEA console, we see the breakpoint log the value of the opcodes:
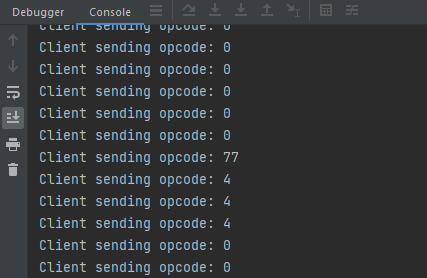
From the screenshot above, you can deduce that the opcode associated with a chat message is 4.
Lastly, let’s wrap up the blog post by examining what we believe to be the Client class aka P.
As previously shown in the call stack, the invocation of the writeOpcode() method originated from within the P class.
To deepen our understanding of the P class, we can set a breakpoint on the same line that was indicated in the call stack. Since we already know that this line will be hit during execution, we can assume that the breakpoint will be invoked. There are situations where it makes sense spraying and praying breakpoints all over the class until one is hit.
As mentioned earlier, the Client class contains references to various instances of interest, such as the localPlayer instance. However, in obfuscated code, identifying the actual types of these instances can be challenging, particularly when the variables are declared with non-descriptive names, as shown in the example below:
...
private jy_0[] pR;
private xx[] p9;
private int px;
private final long[] p8;
private gU pF;
private zw_0 Cp;
private b_0 CC;
public jS[] N;
private String QK;
...
In this case, the variable names lack clear indications of their corresponding types, making it difficult to determine their actual purpose and functionality. However if we were able to examine the values at runtime, we can gain valuable insights that make it considerably easier to discern their intended types and functionalities.
After setting the new breakpoint within the P class, it should automatically hit (assuming you’re logged in). Once the breakpoint is hit, we can examine the fields within IDEA.
For example, let’s attempt to discover what value the QK variable of type String holds. To open the evaluator, hit ALT-F8 or click the little calculator icon in the Debugger view.
Once the Evaluate menu opens, type in the expression you want to evaluate, e.g. this.QK:
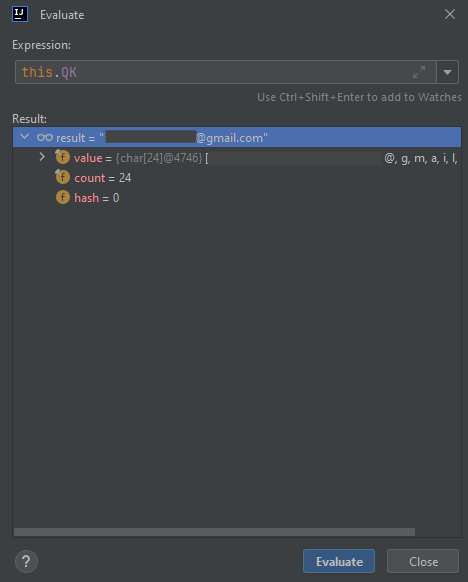
As shown above, we can see that this variable stores the email address associated with our account!
To conclude this section, let’s find something that may be interesting to a bot developer such as the health of our character.
In most cases, the health of a character is usually defined within the localPlayer instance, which is typically of type Player. However, in this particular client, it seems that the conventional assumption does not hold true. This introduces an interesting scenario where the developer has made a small change that deviates from the usual process, thereby throwing off the process.
Instead we can deviate to the class shown in the earlier section which initializes several arrays related to the player’s skills:
/*
 * Renamed from rw.jd
*/

public final class jd_0 {
  public static final String[] b = new String[]{"Attack", "Defence", "Strength", "Hitpoints", "Ranged", "Prayer", ...}
  ...
  public static final int[] P = new int[25];
  public static final int[] p = new int[25];
  ...
Let’s explore the two int arrays shown above. After the breakpoint is hit in the P class, we can call jd.P in the evaluator as the P int array is static:
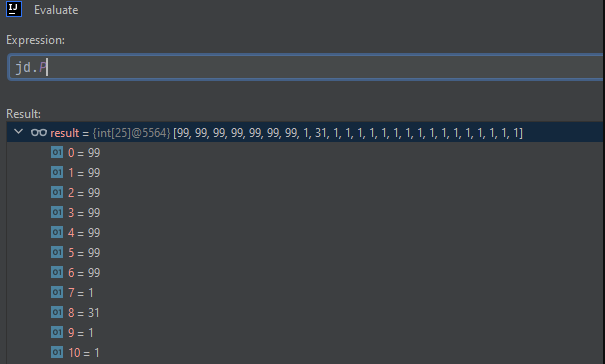
As shown in the image above, thes appear to be the level of our character’s skills. For context, 99 is the maximum level a skill can be in Runescape (not including boosts).
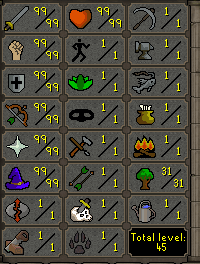
Here is a screenshot of my character’s skills for comparison:
In the realm of Runescape, certain skills, especially those related to combat, can undergo boosts or hindrances. This concept introduces two distinctions: base levels and active levels. The base level represents the constant value of a skill, while the active level reflects any temporary boosts or hindrances applied to that skill. In the case of health, or hitpoints, we are specifically interested in the active level since the base level remains a constant 99.
As we didn’t have any skill boosts at the time the jd.P array was examined, we’re unsure if whether this array holds the base levels or active levels. To confirm, we’ll drink a potion that will boost some skills and hinder our hitpoints and re-examine the field.
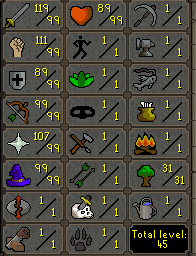
For comparison purposes, here our how are skills appear after drinking the potion (observe the attack skill (sword) is 117 and the hitpoints (health) is now 89):
Let’s re-examine the jd.P int array once more to see if any values were changed due to the boosts:
It shows the same values meaning this array is storing the base levels of our skills. Now let’s examine the int array that’s initialized on the next line, aka p (lower-case):
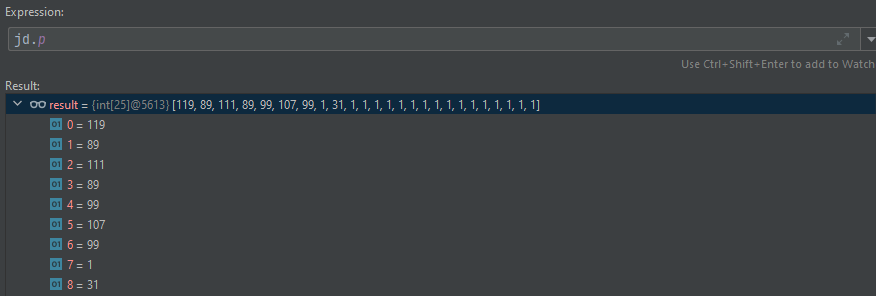
As shown in the evaluation prompt above, comparing the values with the screenshot of our boosted skills, this array does indeed storing our active levels!
Conclusion
The primary objective of this blog post was to showcase various techniques that can be utilized to assist in the deobfuscation of an RSPS Client. These techniques, while specifically demonstrated in the context of RSPS, can be applied more broadly to tackle Java obfuscation in various real-world scenarios.
Please note that the techniques demonstrated above are not an exhaustive list, and there are indeed more advanced and interesting techniques available for deobfuscation. One such approach involves utilizing tools like CodeQL or Tabby to query the code based on specific patterns.
Armed with the knowledge gained from this blog post, you are now equipped to apply the techniques showcased in the talk to develop your own bot client.
Thanks for taking out the time to read this and please reach out if there any questions.
© 2023 Ingredous Labs ― Powered by Jekyll and Textlog theme